Showing posts with label Home. Show all posts

February 9, 2016

Laundry Room Copy Cat

One of the things I love most about my husband is his excitement over home projects. Whenever we have a free weekend, he loves to tackle a project for the home. I love that he wants to make our home beautiful and I also love that he shares the same view as me-- that a home is never done, there's always something to do which makes it so fun especially for a home design nut like me.

In order to convince me to replace our perfectly good butcher block in our kitchen with granite, Luke said we would re-purpose it down in the laundry room. I then shared this image by the v. talented Studio McGee, who I am a mega fan of, and it sort of spiraled from there...

via
Our amazing friend/neighbor and professional tiler, Chris, installed the title for us and yours truly grouted it, which might be one of my favorite diy tasks to do.

So without further ado -- our new laundry room!


Please excuse the horrible nighttime photos, but I have a baby (can that be my excuse for everything always?).


Luke and I think it came out pretty good and are the next Chip and Joanna (I wish #wacoforever). We didn't spend that much either, here's the breakdown:

  • Butcher block was re-purposed  but we got it from Ikea a few years ago
  • tile was $1.99/sq. ft. from Lowe's which I love that it looks like slate, but is actually durable porcelain
  • pendant light also from Lowe's (which Luke had to convert into a plug-in light thanks to the awkward outlet on the ceiling)
  • rug, art, and baskets all from Homegoods
  • paint color is Benjamin Moore Simply White, color-matched to Valspar (which I am not debating painting my whole house in... stay tuned)
 Luke is the laundry-doer of the household, and while he complains, I think he really likes it. He's such a neat freak that I think he enjoys the simple satisfaction of clean, warm clothes from the dryer. But whether he actually likes it or not, I hope the new laundry room makes it even more enjoyable for him. Especially now that our laundry output has exponentially grown thanks to a certain adorable spit-up machine:


August 9, 2013

DIY Monogrammed Pillows

As a newlywed, I'm so excited to have a new monogram and to share a last name with my husband.  I wanted some way to display our newly-married initials, and decided monogrammed pillows for the bedroom the perfect way. 

Like most ideas I have, I knew it could be easily DIYed. A quick Google search led me to this awesome tutorial by Kristen F. Davis Designs. It was a really inexpensive and easy DIY project you could do in an evening after work, like I did.

August 1, 2013

Bamboo Shades

Once in a while something about our house will just start to bug me,  and I feel compelled to immediately act on it. In this case, it was deciding I didn't like our kitchen curtains anymore and desiring a cleaner, more streamlined look. Enter:  bamboo shades. I also decided the living room could benefit from bamboo shades as well--- I'm with Tracey,  I love the look of bamboo shades and light curtains.

A stop at Walmart on my way home one day, led to the impulse purchase of 5 bamboo blinds. The hardest thing was waiting the full next day for Luke to help  me hang them up. I'm really not a fan of having to rely on Luke's skills to complete projects, like I had to with this one. Rather, I prefer being able to stay up until midnight completing a project if I want to, like this one.  I really should learn how to saw and drill...but I'm not sure if that would be safe for anyone.


The shade selection process was easy, Wal-Mart had a limited selection of only these shades, but I liked the way they looked and luckily there was just enough of all the right sizes. I had taken the measurements of all of the windows prior to my "spontaneous" trip for shades, and I wasn't too concerned on getting perfect, custom-sized shades. I knew I could mount the shades for the odder shaped kitchen windows either outside or inside the window trim, depending on the fit, and I'd be happy with the look. For example, the living room windows measured 28" inside the trim, so the 27" shades would leave a half-inch gap on either side, but I was fine with the slight gapping since it would be hidden by the curtains on either side anyways.

The cost was $23 for the 27" shades for the living room, and $34 for the two larger 48" shades for the kitchen. The total cost was $150 for all 5 shades - which is a lot to spend all at once by cheap thrifty me, but relatively inexpensive compared to the cost of custom-sized bamboo shades I had seen elsewhere.

It took us about 2 hours to hang them--with some of that time spent goofing off and me not being the greatest assistant to Luke. I did the measuring, marking, and taping of the handy guide provided, while Luke did the drilling and installing. While Luke stepped outside for a moment, I grew impatient and tried to use the drill myself -- very unsuccessfully. I kept letting the drill slip and completely stripped the screw, surrounding the mount with tiny little marks that look like badly aimed, misfired bullet holes. We all have our strengths.

Once they were up we were both excited and loved the way they looked, and both agreed it majorly changed the way both our kitchen and living room looked. I love that I am married to a man who appreciates these types of things!


So here is the living room with regular, white blinds before:


And after:


A couple other little changes were made, in addition to the addition of bamboo shades, mainly because I can't stop rearranging picture frames everywhere all the time. But I think the shades bring such a nice added texture to the room. Something about the room kept nagging at me but I couldn't put my finger on what it was-- I couldn't even make a To Do List for it! There wasn't anything in-your-face horrible about the room, but replacing the plastic shades with bamboo made me realize that I think the room was just too flat.  I think the shades are a nice step to adding more dynamic and texture to our living room.
 
And as for the kitchen....
 
I sadly can't find a before photo, but the bamboo shades replaced floral curtains which I had actually made from 3 Target tablecloths. The curtains ended up not really being a look I enjoyed in the kitchen.
 
And after- a definitely more polished, sleeker look than the big, billowy curtains before.


Dexter is loving them too.


We also both agreed it was a victory that we completed  this project without killing each other-- that's they type of loving relationship we have :) Small victory, compared to a slight yelling match that took place during our mirror reframing project in which at one point I actually said to him: "John and Sherry do NOT act like this when they work on DIY projects together!!!!"

July 31, 2013

DIY Board & Batten

So I'll say it --  I've been kicking butt in the DIY house projects' department. This DIY board and batten project took me a while to complete, mostly because I needed Luke to cut the wood for me (I do not trust myself with a saw!), but it could have definitely been done a lot quicker. I am SO happy with how it came out, and it was so easy to do and I love the progress I'm making with the laundry room makeover plan.


There are so many easy-to-follow tutorials online, I especially relied on: Young House Love 's and Centsational Girl 's. It was a really cheap and instantly gratifying project to totally transform a room. The wood was so inexpensive and I just used white trim paint I already owned. The thing about this is -- you don't have to put up the "board" just the "battens". Once you attach your chair rail and vertical battens to the wall, you cover it all up with paint and it look like the entire piece was installed. Luke thinks I should do this in other rooms in our house now too!


Here's a look at the difference adding the board and batten made:
 

Definitely adds more interest to the room and makes it look more structured. Sill more to do, my next task is to replace the paper lantern and get a new rug (or at least iron the existing one, yeesh!) 
 
Love being able to check things off my House To Do List!
 
  • Install shelving above the washer and dryer. I've purchased shelves, brackets, and a pole to hang and dry clothes from, just waiting on my handy husband to help me install
  • Replace current paper lantern with a DIY drum shade light fixture.
  • Install board and batten. I've been following the Young House Love tutorial and so far so good! This is the biggest DIY I've attempted, though Luke did the cutting and nailing... baby steps... 
  • Come up with ways to hide weird dryer cords and circuit breaker
  • Shelving for a little nook to store misc things
  • Decide once the board and batten is up if I want to repaint the yellow paint color
  • Purchase baskets for shelving
  • Purchase or repurpose existing jars for detergent and dryer sheets
  • Art for wall
  • New rug
  • DIY curtain

  • July 25, 2013

    How to Not Freak Out While Painting Stripes

     
    I'd been wanting to paint stripes somewhere in my house since we moved in, and I finally did it. I love the result and surprised myself with how good it came out. I had nightmares of paint bleeding through, painting the wrong stripe, wrong measurements, crooked lines. Fortunately, none of this happened because I was aptly prepared (the countless hours spent looking at blogs paid off!) 

    Oh hey ! I've been trying to think of an accent color for the bathroom - I think the emerald looks great!

    I'm so glad this project is over, because it really took over my life the past few days. I kept painting at the most inopportune times because I was just so excited to get it done. Late one night, for example, I told myself I would just do a second coat and remove the tape for one stripe, "just to see if it worked...". Before I could stop myself, it was midnight and I had manically finished painting and removed all of the tape from 90% of the bathroom. Then, dressed and ready for work the next morning, I finished the rest and was so excited to see the finished results.


    I won't go into the details of the entire project, there are so many great tutorials out there - I used Unskinny Boppy's , Young House Love's , and Life in Grace's (which was actually my inspiration for this project, below)

    
    Striped bathroom at Life in Grace blog


    Because I am pretty clumsy when it comes to DIY projects like this, I wanted to share my tips for how to not freak out while painting stripes on your wall:
     

    Tip #1: Measure the entire length of your wall and decide on the quantity and width of stripes. My wall was 88 inches so I decided to make it easy and do 11 -  8 inch stripes. I found drawing it out helped my visual brand, too.


    Tip#2: This leads to the next tip - shoot for an odd number. This way your top and bottom stripes are the base color and you don't have to paint stripes that touch the wall and ceiling (less careful, cutting-in painting, which I hate)

    Tip #3: Use tape to mark off what not to paint - this was huge for me, as I was sort of in monster-mode and if not for the tape, probably would have accidentally painted a stripe the wrong color.


    Tip  #4: Don't bother with the laser level or even a regular level for that matter, just measure and mark off with pencil a few times along the wall then eyeball the tape along the lines. I used a measuring tape, but next time I will use a seamstress tape measure and tape it under the ceiling and mark out my stripe increments all the way down the wall and just keep moving it along the wall.

    Tip #5: Don't stress too much about the straightness of the tape or the exact width of the stripes - you'll lose your mind (and maybe throw out a few very unladylike words) I almost started to flip out, then I took a deep breath and decided to get over it. You'll get a hang of the taping, the first couple are tricky then it gets easy and methodical.


    Tip #6: Get your tools together - I used Scotch Blue Painter's Tape and it worked wonderfully. I also used a 3 inch roller for the stripes and a paint brush for the cutting-in and corners.


    Tip #7: After all lines are taped,  paint your base color and lightly over the edge of the tape with a brush (just the tape that will be eventually painted over with your stripes' color) - this seals the tape and makes for perfectly crisp lines.


     Tip#8: Paint one coat of the stripes' paint, let dry, paint second coat and immediately remove tape.

    Tip #9: If you're doing a bathroom, I highly recommend going with a semi-gloss sheen. If you get your stripes color on the base color, it wipes right off with a damp paper towel.


     Tip #10: And lastly, (because I feel this list needed to have ten tips) make sure to have extra of your base color, it's inevitable you'll have to do a little touching up.


    There you have it - I hope you try this, it's a lot easier to do than you'd imagine. And the excitement you'll feel (or was it just me?) when you pull off that tape to reveal your perfect stripes makes it absolutely worth it. (I think at one point I even let out an actual squeal of excitement)  I plan to add in a pop of come color (thinking yellow, emerald, or coral), easy to do with some new towels and bath mat. Can't wait to share an updated, less messy picture of the final result!


    July 19, 2013

    Playing Koi

    Sorry for the stupid pun blog title... just one of my attempts to be more like John and Sherry.

    Anyways, my husband, Luke, does so many incredible things around our house to make it beautiful. He blew me away with this one and I couldn't believe how fast he completed it. I wish I could take even an ounce of credit for this one, but admittedly, I cannot. This one is all Luke.


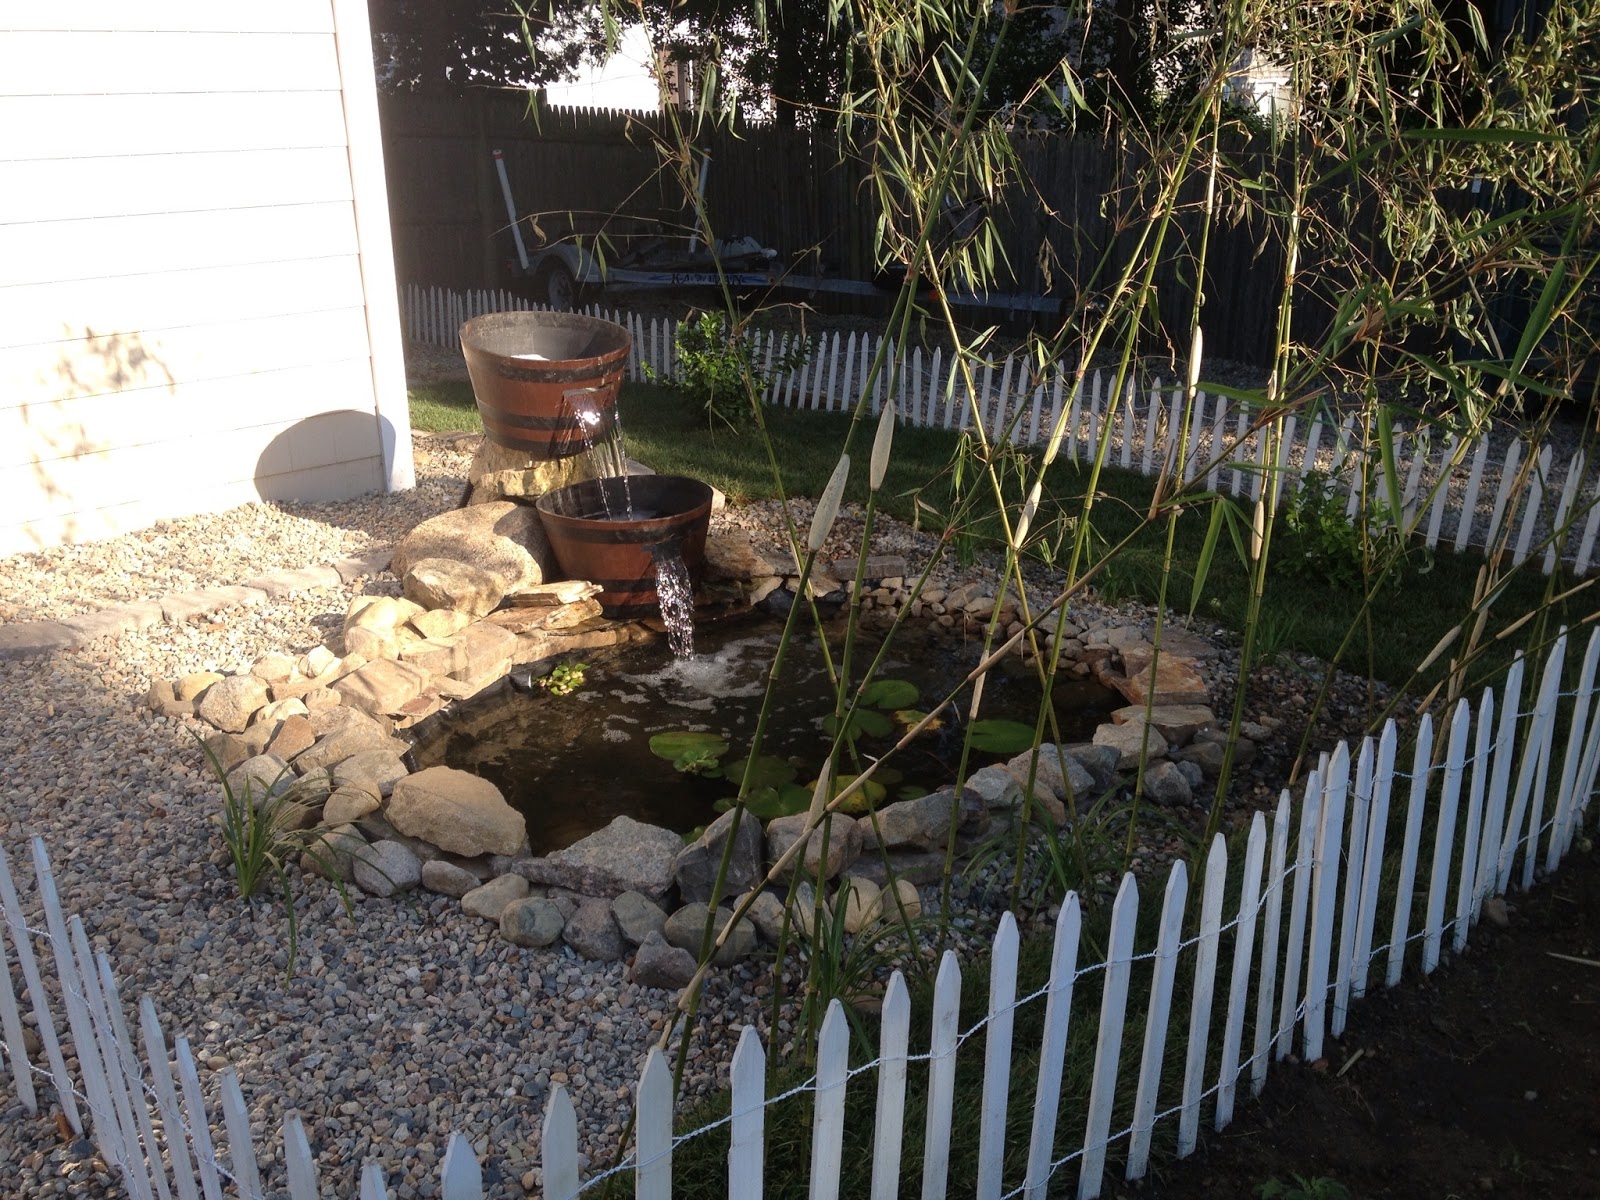
    When I left for work there was just a big, dirt hole in our yard. When I came home I found this:


    I couldn't believe it! It should be noted that it was about 90 degrees this day too. When Luke sets his mind on a project he works tirelessly until it's complete, it's so impressive. I definitely need to take a lesson from him on finishing projects in a timely manner.
     
    So in just a day later he had finished the pond. It took him a little while to get the waterfall part just right. He played around with a few different options and ended up with the great idea to use to whiskey barrels.


     Luke lined around the pond with rocks, and added lily pads and other aquatic plants. He got goldfish and koi and will soon be getting turtles. He transplanted some bamboo from his parents' house which looks very zen-like around the pond. I love the waterfall he made with the two whiskey barrels, the sound is so soothing and it reminds me of something from Splash Mountain at Disney World. Luke also wants to get a light for the bottom of the pond (which will look so cool at night) and a bench. Not sure I'll be spending too much time on that bench once there are turtles roaming around though...kinda weirds me out. And finally, he planted grass around the pond and is growing blueberry plants, tomatoes, and a few other vegetables.
     
     
     The best I could do for a before picture was from our home appraisal.  But, the "before" was basically nothing - the grass never really grew and it ended up just being a mix of mud and poison ivy (which Luke regularly got and actually currently has). I, on the other hand, was never affected by the poison ivy-either I'm not allergic or because I never do any manual labor outside (sorry, Luke!)


    But my husband has found the perfect solution - to use that area for a koi pond (soon to be turtle pond...) and extended garden. I'm so proud of him and what he was able to do, his landscaping abilities cease to amaze me. Let's just hope he doesn't order a rare $700 turtle online. Yes, that's a thing and yes he has mentioned it to me. I'm nervous.


    July 9, 2013

    Bedroom Pretty-fying

    I feel that your bed should be the prettiest part of your home, it is the place you spend 1/3 of your life! I know the exact polished look I want for my own bed, but it's been hard prioritizing a part of the house that only the two of us see.


    I was long-overdue touring my friend, Traci's, new condo last Sunday and I thought her bed was so pretty, prompting me to photograph it.


    July 5, 2013

    Kitchen To Do List


    The kitchen is our biggest priority in the house. Did I say that about our patio and laundry room as well? Anyways, this time I mean it. I dream of Carrera marble countertops (though I know its impractical), white subway tiling, white cabinets, open shelving and industrial overhead lighting.

    I'll spare you (or at least save for the end) the long-windedness this post and go right to the to do list:
    • Replace or paint kitchen cabinets white
    • New knobs for the cabinets
    • Replace two of our impractical cabinets with open shelving
    • Install white subway tile
    • Replace existing curtains with something more natural looking, perhaps jute roman shades
    • Replace overhead lighting, something more industrial looking
    • New counter stools - I have always ogled these ones
    • Replace sink with a metal, single basin sink
    • Install new countertop - still deciding on this one! I'm thinking Carrera marble might not be the way to go, I could see myself having a serious irrational meltdown over a very likely stain or scratch. Some other options:
    • Laminate Carrera Marble (it's a thing! and it looks nice in pictures, but I'm not sure if I want to go with laminate again...)
    • Granite (trying to decide if I would go with light or dark...)
    • Extend/finish cabinetry over the fridge and to the left of fridge (a large pantry cabinet)
    So much to do and it definitely won't be cheap. The biggest expense would be replacing the cabinets, so we are leaning towards painting our existing ones and splurging on new countertop.  We had a consult with Lowe's and the quote was what we expected (a lot of money!), so we have some decisions to make. We loved the design (below) and it's amazing how much it looks like our actual kitchen, but I guess that's the idea!


    I've been tirelessly researching the process of repainting kitchen cabinets and know that it's definitely not an easy process. It would save us a lot of money, but it's definitely the more challenging and unpredictable option. If we don't do it 100% right, as in let each coat fully cure, we're looking at a life of chips and peeling paint. While the cabinets themselves are in okay shape, it might  be silly and impractical to completely replace them anyhow.

    BUT Luke has seen the soft-close drawers and I'm not sure he can live without them. One of the many things I love about Luke is his appreciation and keen eye for the finer side of home design. You might have gained the sense from his love for the Newport. I think I left out the fact that Luke was slightly more smitten with it than I was.

    While we make some decisions, I'll be continuing to throw together inspiration ideas:


    July 2, 2013

    Laundry Room Makeover Plan

    We accumulate So. Much. Laundry.

    It's gotta be equivalent to a family of 5, yet it's just the 2 of us...very suspicious. 

    Anyways, that's reason enough to make our laundry room more beautiful. For the simple fact that I'm in it so freaking much. [Luke would say that statement was false and claim he's in it more, but it's my blog.] Here are some of the images that inspired my laundry room plan. I love the pretty and practical shelving, natural baskets, and fancy jars for detergent and dryer sheets.
     

    So, just like our patio's, I have made the Laundry Room To Do List:
    • Install shelving above the washer and dryer. I've purchased shelves, brackets, and a pole to hang and dry clothes from, just waiting on my handy husband to help me install
    • Replace current paper lantern with a DIY drum shade light fixture.
    • Install board and batten. I've been following the Young House Love tutorial and so far so good! This is the biggest DIY I've attempted, though Luke did the cutting and nailing... baby steps... 
    • Come up with ways to hide weird dryer cords and circuit breaker
    • Shelving for a little nook to store misc things
    • Decide once the board and batten is up if I want to repaint the yellow paint color
    • Purchase baskets for shelving
    • Purchase or repurpose existing jars for detergent and dryer sheets
    • art for wall
    • New rug
    • DIY curtain

    Here are the before shots. Please excuse the mess, I was in the middle of doing our aforementioned massive amount of laundry. I'll be happy when I have a place to line-dry clothes from, as you can see my current method is less than ideal.


    June 27, 2013

    Patio To Do List & Outdoor Sectional

    We have a big list of to-do's for our house that we are really focused on. (Now that I don't have wedding planning as an excuse anymore!) Luke is always working on some house project and I'm trying to do adopt his work ethic and take on a few projects of my own. I'm so in awe of his ability to see a project completely through. Mainly because I struggle with actually executing one of the many projects I have both in my head and on my Pinterest page.

    High up on our to-to list, is working on our outdoor space. Though summer is a short 3-4 months in New England, we take full advantage of our backyard in that time. Dining al fresco, s'mores around our fire pit, reading in the new hammock...
    While our to-do list is a long one, one thing we can check off is purchasing an outdoor sectional!

    It's taken us a while to find one we liked, of good quality and still under our budget of $1000. We fell in love with the Newport while shopping at Crate & Barrel one day, but it was way out of our budget. We could barely afford just one of the pieces, even with the 20% off sale.
     

    We also really liked the ARHOLMA sofa from IKEA, which was a really good, more affordable comparison to the Newport. It was definitely more in line with our budget, on sale for $635. But unfortunately, one of the pieces is currently out of stock and backordered a customer service rep informed me.
     
     
    Our hunt continued until last week when we finally found one that was only half of our budget and probably 10% of the cost of the Newport. I actually never totaled up how much the Newport would have cost, I could fathom how much all of those pieces together would have cost. Way too much for a girl who is not above shopping at Walmart for everything.
     
    Including where we found our new sectional from Walmart! We pulled the trigger after reading all of the great reviews and it was delivered very quickly. Did I mention it only cost $499?! This is what the online photo looked like:
    And here's ours:


    Working together, it took us less than an hour to put together. Might be strange, but I actually think putting stuff together like this is fun (might be because I've never shopped at IKEA....)  The cushions are big and comfy and it came with a coffee table as well.  
     

    I think it looks even better than the online photo (which almost never happens)! While it may not be the Newport, we think we'll be very happy with our Walmart couch. I'm looking forward to summer nights bringing a wine night-in with girlfriends outside, late afternoon post-beach naps in the sun and bringing a TV outside (wouldn't be the first time Luke's done this...) for a movie night under the stars.

    BUT the to do list continues! Still left to do to make our patio everything we envision:
     
    • buy turquoise and red-orange throw pillows to tie in the Adirondack chair colors around the fire pit.
    • buy big plants to fill our pots for either side of the couch
    • perhaps spray paint said mismatched pots gold to create a more uniform look
    • paint the cement patio. I still need to decide on a color and if I want to attempt a fun pattern like this one.
    • string my cafĂ© lights
    • buy new chairs for the table
    • purchase new umbrella for table
    • eventually build a pergola over the patio too
    Ambitious? Yes. But not when your married to Luke. I'm in for a long, hard-working summer...